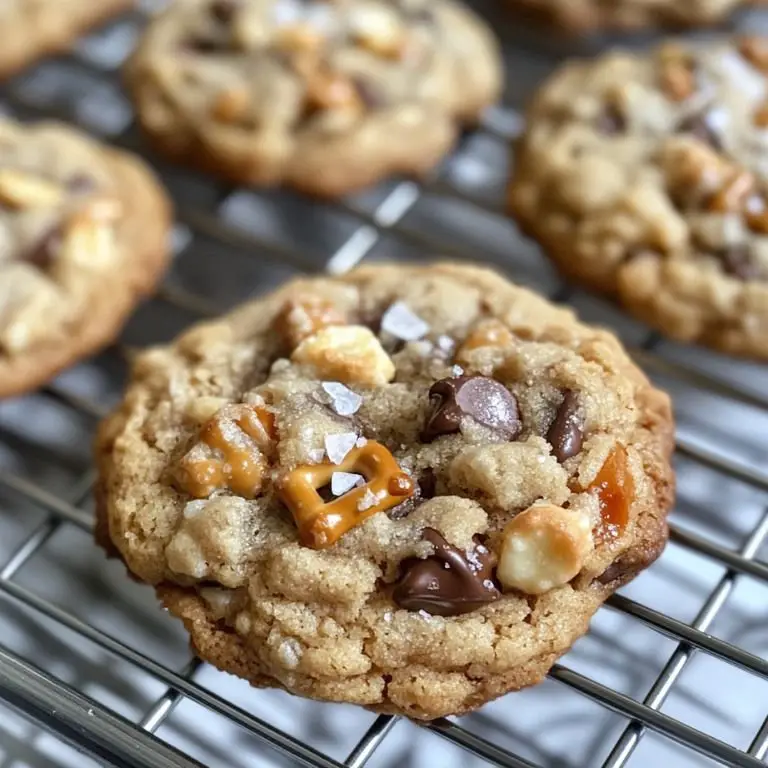
There’s something undeniably magical about a cookie that brings together sweet, salty, crunchy, and chewy all in one bite. That’s exactly what these Sweet and Salty Kitchen Sink Cookies do! Named for their “everything but the kitchen sink” approach, these cookies pack in chocolate chips, pretzels, caramel, potato chips, and more. If you’ve ever tried the famous kitchen sink cookies Panera offers, you’ll love making a homemade version that’s just as decadent—but even better because you can customize them exactly how you like!
The true magic of kitchen sink cookies lies in the bold, unexpected mix-ins that provide both flavor and texture. Semisweet chocolate chips are a classic anchor—rich and slightly bitter to balance the sweetness. White chocolate chips add creaminess and visual contrast. Caramel bits bring chewiness and a deep buttery flavor, while pretzels and potato chips lend a satisfying salty crunch that makes each bite pop.
If you're feeling adventurous, consider using chopped toffee, mini peanut butter cups, crushed cornflakes, or even dried fruit like cranberries or cherries. Chopped nuts (such as pecans or walnuts) contribute a rich earthiness, while flaky sea salt on top creates the ultimate sweet-salty finish. The combinations are nearly endless—just make sure your mix-ins aren’t too moist or they’ll affect the dough's consistency.
One of the best things about these cookies is how customizable they are. You can switch out ingredients based on dietary preferences, flavor cravings, or whatever’s hanging around in your pantry.
For a more indulgent twist, swap regular caramel for dulce de leche chips or add crushed candy bars. If you want to lean into savory, try incorporating salted pretzel rods, corn chips, or even crumbled bacon for a brunch-worthy treat. You can also go healthier by using dark chocolate chunks, chia seeds, or shredded coconut.
To make them gluten-free, use a 1:1 gluten-free flour blend and ensure all your mix-ins (especially pretzels and chips) are certified gluten-free. Vegan versions can use plant-based butter and egg substitutes like flax eggs or aquafaba, with dairy-free chocolate chips and caramel alternatives.
These cookies are built for creativity—don’t be afraid to make them your own.
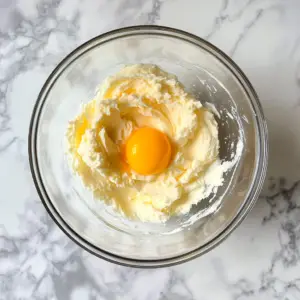
To achieve that perfect texture—crispy on the edges, chewy in the center—you’ll want to pay close attention to a few key baking tips. First, make sure your butter is truly softened (not melted), so it creams properly with the sugars, creating air pockets that help with rise and texture.
Chilling the dough for at least 30 minutes before baking helps prevent spreading and intensifies flavor. When portioning, use a cookie scoop for uniform size to ensure even baking. Leave enough space—at least 2 inches—between cookies on the tray.
For best results, bake until the edges are just golden while the centers still look slightly underdone. They’ll continue to firm up as they cool. Rotating the pans halfway through baking ensures even browning. And always let them cool on the baking sheet for five minutes before transferring to a wire rack to set fully.
These cookies pair wonderfully with a tall glass of cold milk or a hot cup of coffee. For an extra indulgent treat, serve them warm with a scoop of vanilla ice cream. If you’re a fan of contrasts, try pairing them with a tangy lemonade for a surprisingly delicious combo!
To keep your cookies fresh and chewy, store them in an airtight container at room temperature for up to five days. Adding a slice of white bread to the container can help maintain moisture. If you're in a particularly humid or dry climate, adjusting storage time accordingly is key.
These cookies also freeze beautifully. You can freeze baked cookies by placing them in a single layer on a baking sheet until firm, then transferring to a freezer-safe bag or container. They’ll keep for up to 3 months.
Want fresh cookies on demand? Freeze the dough balls instead. Scoop them onto a tray, freeze until solid, then store in a zip-top bag. When ready to bake, place them on a baking sheet and bake from frozen—just add an extra 1–2 minutes to the baking time.
Even with a flexible recipe like this, a few common missteps can derail your batch. Overmixing the dough once you’ve added the flour can lead to tough cookies. Stop mixing as soon as the dry ingredients are just incorporated.
Another mistake is overloading the dough with mix-ins. While it’s tempting to go wild, too many can cause cookies to fall apart or bake unevenly. Stick to the suggested quantities unless you’re scaling the base dough.
Improperly measuring flour (especially too much) can make the cookies dry. Always spoon and level your flour rather than scooping it directly with a measuring cup. And don’t forget to use fresh leavening agents—baking soda and powder lose their power over time.
Finally, make sure your oven temperature is accurate. Using an oven thermometer can help you avoid underbaking or burning your cookies.
Want to make these cookies even easier to serve or transport? Turn them into cookie bars! Simply press the dough into a parchment-lined 9x13-inch baking dish and bake at 350°F for 22–25 minutes or until golden and set in the center.
Cookie bars give you all the flavor of kitchen sink cookies with less effort—no need to scoop individual portions or bake in batches. You can cut them into squares or rectangles once cooled and even drizzle them with melted chocolate or a caramel glaze for extra flair.
This method is perfect for potlucks, bake sales, or feeding a crowd with minimal fuss.
These cookies are a hit with kids—and they’re also a great opportunity for hands-on kitchen fun. Let little ones help measure and dump in mix-ins, stir the dough, or press the chips and pretzels on top.
To make them even more kid-friendly, consider turning the cookies into mini versions using a small scoop, or shaping the dough into fun forms like hearts or stars using molds. You can also set up a “cookie station” where kids can choose their own mix-ins to create personalized versions.
For a fun family activity, turn the baking session into a mini science lesson about texture, flavor combinations, and how baking transforms ingredients. It's a treat that satisfies their sweet tooth and their curiosity.
Absolutely! Swap out the pretzels for graham crackers, the caramel bits for toffee pieces, or the potato chips for crushed cornflakes. These cookies are meant to be flexible!
The mix of textures and flavors is what sets them apart. These cookies are both chewy and crisp, sweet and salty, giving you a little bit of everything in every bite.
Yes! They have the same indulgent mix of ingredients, but homemade versions let you tweak the ratios to your liking and make them even more delicious.