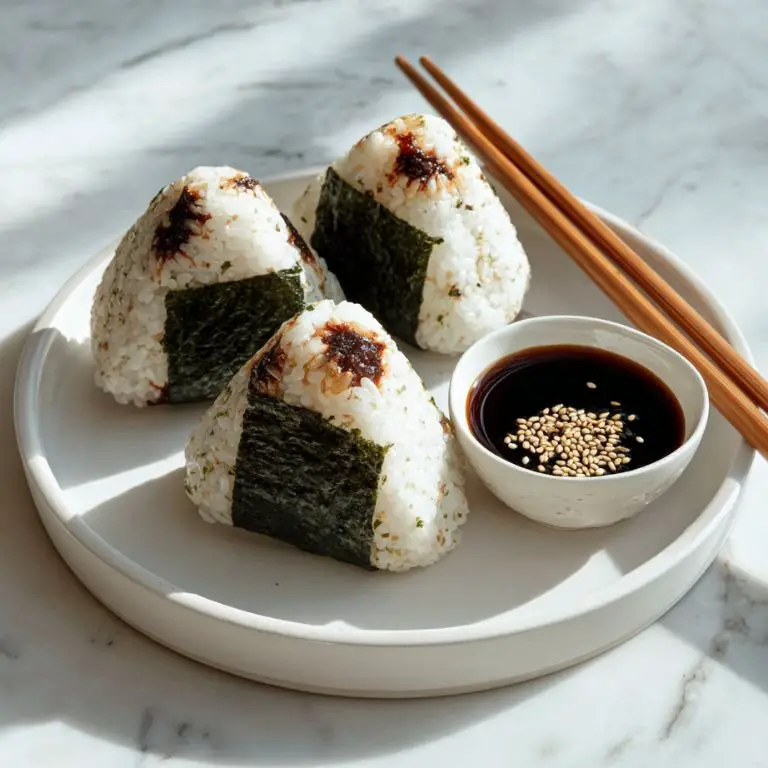
If you're looking to dive into the world of vegan Japanese recipes or are simply craving a flavorful, hand-held snack, this vegan onigiri with umeboshi and nori wrapping is about to become a favorite in your kitchen. These delightful rice balls are packed with a tangy umeboshi (pickled plum) center and wrapped in crisp, salty nori, making them one of the most iconic—and photogenic—Japanese snacks. Whether you're aiming for that onigiri aesthetic in your bento box or simply looking for easy dinner recipes or healthy snacks to meal prep, this onigiri recipe vegetarian and vegan-friendly delivers all the umami without any fuss.
Vegan Onigiri with Umeboshi and Nori Wrapping
Prep Time 15 minutes mins
Cook Time 20 minutes mins
Total Time 35 minutes mins
Course Appetizer, Snack
Cuisine Japanese
Essential equipment
Rice cooker or pot with a tight-fitting lid
Small bowl of salted water (for wetting hands)
Sharp knife (for cutting nori)
Mixing bowl
Clean towel or plastic wrap (to cover rice as it cools)
Alternatives and helpful additions:
Onigiri mold (for a more uniform look—great for that cute onigiri vibe)
Plastic wrap or reusable onigiri packaging (if prepping for lunchboxes)
Silicone bento dividers (to keep your onigiri from getting soggy when packed with other foods)
For the rice balls (onigiri)
- 2 cups Japanese short-grain rice such as sushi rice
- 2 ½ cups water for cooking the rice
- 1 ½ tsp sea salt plus more for your hands when shaping
- 6 –8 umeboshi Japanese pickled plums, pitted
For wrapping
- 1 sheet of nori cut into 6–8 strips
Optional fillings and add-ons
- Furikake vegan-friendly rice seasoning
- Toasted sesame seeds
- Shiso leaves for extra flavor
- Avocado or pickled daikon for variety
Cook the rice properly
Start by rinsing your short-grain rice in cold water 2–3 times until the water runs clear. This removes excess starch and prevents your onigiri from getting mushy. Combine the rinsed rice with water in a rice cooker or pot, and cook according to your equipment’s instructions. Once done, let it steam for 10 minutes before fluffing with a rice paddle or fork.
Prep the fillings
While your rice cooks, pit your umeboshi if they aren't already. Umeboshi are intensely salty and sour, so one per rice ball is usually enough. If you're adding any optional fillings like avocado or pickled veggies, now’s the time to prep those too.
Get your workstation ready
Prepare a small bowl of cold water and dissolve about a teaspoon of salt in it. This is for dipping your hands before shaping each rice ball, which prevents sticking and seasons the outside of the onigiri. Also lay out your nori strips and any garnishes or extra fillings.
Shape the onigiri
While the rice is still warm (but not hot enough to burn), wet your hands with the salted water. Take about ½ cup of rice and flatten it into a small disk in your palm. Place one umeboshi in the center, then mold the rice around it into a triangle or round shape. Don’t compress it too hard—just enough to hold together.
Wrap with nori
Take a strip of nori and wrap it around the base or side of the onigiri. The seaweed helps you hold it without getting sticky fingers and adds a burst of umami. For that picture-perfect onigiri aesthetic, you can also wrap it completely or use cute onigiri face stamps or molds if packing for kids (or just for fun).
Garnish and serve
Sprinkle with sesame seeds, vegan furikake, or tuck in some shiso for extra flavor. Serve immediately or pack them using onigiri packaging if you're meal prepping.
Perfect Pairings
This umeboshi onigiri is bright, salty, and slightly sour, which makes it ideal with a range of sides.
- Miso soup – A classic Japanese pairing that brings warmth and balance.
- Edamame or lightly salted soybeans – An easy and protein-packed side.
- Cold soba noodles with dipping sauce – Especially great if you're turning this into a full meal.
- Pickled veggies or tsukemono – Like takuan (pickled daikon) or cucumber sunomono for a crisp contrast.
- Japanese green tea or barley tea – Earthy and cleansing on the palate.
For something more fusion-style, try serving your onigiri with a vegan sushi platter or even alongside roasted veggies from other easy dinner recipes.
FAQs
1. Can I use brown rice instead of white rice?
Technically yes, but white Japanese short-grain rice gives the best texture for molding. Brown rice doesn't stick as well. If you're set on using brown rice, try mixing it half-and-half with white short-grain rice or use a mold to help hold the shape.
2. What other vegan fillings can I use besides umeboshi?
Great question! Other vegan onigiri ideas include mashed avocado with lemon, miso-glazed tofu cubes, sautéed mushrooms, or spicy pickled veggies. These all fit beautifully into any vegan onigiri recipe and can help mix up your meal prep routine.
3. Can I freeze vegan onigiri?
You can, but the texture will change slightly. If freezing, wrap each onigiri tightly in plastic wrap and then foil. Reheat in the microwave with a damp paper towel to restore some softness. Nori should be added fresh after reheating.
4. What kind of rice should I use for onigiri?
Always go for Japanese short-grain rice or sushi rice. The starch content helps it hold its shape. Avoid jasmine or basmati rice—they're too dry and will fall apart.
5. How long can vegan onigiri stay out?
Because there’s no meat, they’re a bit safer at room temp. Umeboshi is a traditional preservative too. Still, aim to eat them within 4 hours if unrefrigerated, or store in the fridge for up to a day. Wrap well to prevent drying out.