Nothing beats the taste of homemade brioche—a rich, buttery, and incredibly soft bread that feels like a warm hug with every bite. Whether you’re making French toast, a gourmet sandwich, or just slathering it with butter and jam, this classic soft bread recipe delivers a pillowy texture and slightly sweet flavor that’s hard to resist. Plus, making bread from scratch is easier than you think with the right approach!
Choosing Between All-Purpose vs. Bread Flour: What’s Best for Brioche?
When it comes to making brioche, the type of flour you choose can subtly affect the final texture.
All-purpose flour is a great standard choice, producing a tender, soft crumb that makes your brioche incredibly fluffy and almost cake-like. It’s perfect if you want a melt-in-your-mouth experience. On the other hand, bread flour contains a slightly higher protein content (usually around 12–14%) compared to all-purpose flour (around 10–12%). This added protein helps develop more gluten, giving the bread a bit more chew and structure. If you love your brioche just a touch heartier while still soft, bread flour is a fantastic option.
Bottom line: If you want a pillowy, melt-in-your-mouth texture, stick with all-purpose. If you prefer a chewier and slightly more robust bite, opt for bread flour.
Understanding Yeast: Active Dry vs. Instant Yeast for Homemade Brioche
Yeast is what gives brioche its beautiful rise and airy texture.
Active dry yeast is most commonly used in homemade recipes. It needs to be dissolved in warm liquid (like your warmed milk) and proofed before being mixed into the dough. You’ll know it’s ready when it becomes frothy—a sign the yeast is alive and active.
Instant yeast (also called rapid-rise yeast) can be mixed directly into dry ingredients without proofing. It tends to work a bit faster, shaving 10–15 minutes off your rising times.
However, for brioche, where flavor development is key, many bakers prefer active dry yeast because the slower fermentation can deepen the bread’s taste.
Pro tip: If using instant yeast instead, reduce the first and second rise times slightly, and keep a close eye so you don’t overproof the dough.
First Rise vs. Second Rise: Why Both Steps Matter for Fluffy Bread
Both the first and second rise are crucial for achieving that signature brioche fluffiness:
- First Rise (Bulk Fermentation): After mixing and kneading, the dough needs time to rest and ferment. This stage develops flavor, allows the yeast to create gas bubbles, and strengthens the dough structure.
Skipping or rushing this step would result in dense, flat bread.
- Second Rise (Proofing): After shaping the dough into balls and placing them in the loaf pan, a second rise lets the dough become even lighter. This final proofing ensures a lofty, tender loaf.
The dough should nearly double in size again but not over-expand, or it could collapse in the oven.
Tip: If your kitchen is cool, place your dough in a slightly warm (but turned-off) oven to help both rises along.
Soft Brioche Bread
Prep Time 20 minutes mins
Cook Time 30 minutes mins
Rise Time 3 hours hrs
Total Time 3 hours hrs 50 minutes mins
Course Breakfast, Dinner, Lunch
Cuisine French
Stand mixer with a dough hook or a large mixing bowl and elbow grease!
Measuring cups and spoons
Large Mixing Bowl
Plastic wrap or clean kitchen towel
9x5-inch loaf pan or two smaller loaf pans
Pastry Brush
Wire rack for cooling
Dough
- 4 cups all-purpose flour or bread flour for extra chewiness
- 1/4 cup granulated sugar
- 1 packet 2 1/4 tsp active dry yeast
- 1 tsp salt
- 1/2 cup whole milk warmed (about 110°F)
- 4 large eggs room temperature
- 1/2 cup unsalted butter softened and cut into chunks
Activate the Yeast
In a small bowl, mix the warm milk, yeast, and a pinch of sugar. Let it sit for about 5–10 minutes until frothy. If it doesn’t foam up, your yeast may be inactive, and you’ll need to start over with fresh yeast.
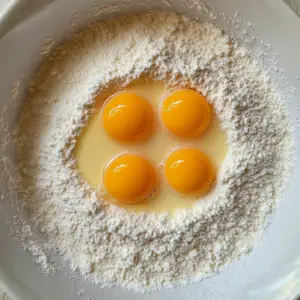
Mix the Dough
In a stand mixer bowl, combine flour, sugar, and salt. Add the eggs and yeast mixture. Mix on low speed until the dough starts coming together. Gradually add the butter, one piece at a time, allowing it to fully incorporate before adding the next.
Knead the Dough
Once all ingredients are combined, increase the mixer speed to medium and knead for about 10 minutes. The dough should be soft, slightly sticky, and elastic. If kneading by hand, expect to work it for about 15 minutes.
First Rise
Transfer the dough to a greased bowl, cover with plastic wrap, and let it rise in a warm spot for about 1.5 to 2 hours until doubled in size.
Shape the Loaf
Punch down the dough and transfer it to a lightly floured surface. Divide into six equal portions, roll each into a ball, and place them side by side in a greased loaf pan. Cover loosely and let it rise again for about an hour.
Egg Wash & Bake
Preheat the oven to 350°F. In a small bowl, whisk together the egg and milk, then brush it over the top of the dough for a golden crust. Bake for 30 minutes or until the top is deep golden brown and the bread sounds hollow when tapped.
Cool & Serve
Let the bread cool in the pan for 10 minutes before transferring it to a wire rack. Slice once cooled and enjoy your fresh bread recipe!
Best Pairings
Brioche is incredibly versatile and pairs well with:
- Sweet spreads: Honey, jam, Nutella, or cinnamon butter
- Savory fillings: Ham and cheese, smoked salmon with cream cheese, or grilled chicken
- French toast: This bread soaks up custard beautifully, making it perfect for a decadent breakfast.
Shaping Techniques: Braided, Rolled, or Classic Brioche Loaves
One of the fun parts of brioche baking is shaping the dough!
Here are a few options to get creative:
- Classic Loaf (Six Balls): The method in this recipe, where you shape six even balls and place them side by side in a loaf pan, creates a beautiful "pillowy" top when baked.
- Braided Brioche: Roll the dough into three long ropes and braid them like a traditional challah. Place the braid into a loaf pan for a stunning presentation.
- Rolled Brioche: You can roll out the dough into a rectangle, then roll it up tightly into a cylinder before placing it in the loaf pan. This creates a spiral-like structure inside the loaf.
Each shaping method slightly changes the final crumb, but they all taste delicious.
Pro tip: Always shape gently to preserve the air bubbles developed during the first rise!
Egg Wash Secrets: How to Get the Shiniest, Most Golden Crust
That deep, glossy brown crust on brioche? It’s all thanks to a simple egg wash.
How to do it right:
- Use one whole egg whisked with one tablespoon of milk for the best balance of color and shine.
- Lightly brush the wash over the entire surface of the dough before baking, but avoid letting too much drip into the loaf pan (it can burn).
- For extra shine, you can apply a second coat of egg wash halfway through baking—but this is optional.
Bonus tip: Some bakers prefer brushing just with egg yolk for a darker color, but using whole egg gives you a more balanced finish that's less likely to crack.
Troubleshooting Common Brioche Problems
Even experienced bakers sometimes hit a few snags with brioche. Here's how to fix common issues:
- Dough too sticky to work with: Add a tablespoon of flour at a time during kneading, but don’t add too much—you want a slightly sticky dough for the fluffiest bread.
- Bread didn’t rise well: Check your yeast freshness. Also, ensure your dough is kept warm enough during both rises (around 75–80°F is ideal).
- Loaf collapsed in the oven: This usually means the second rise went too long. Aim for the dough to rise just until doubled, not more.
- Bread is dry or crumbly: Be careful not to overbake. Start checking your loaf at the 25-minute mark.
With a little patience, brioche is very forgiving and well worth the effort!
How to Store, Freeze, and Reheat Brioche Without Losing Freshness
Brioche is best enjoyed fresh, but it stores surprisingly well when handled properly:
- Room Temperature Storage: Keep the cooled brioche in an airtight bag or container for up to 3 days. Avoid refrigerating—it dries the bread out faster.
- Freezing: Wrap the loaf tightly in plastic wrap, then in foil. Freeze for up to 2 months. To serve, thaw it at room temperature while still wrapped to retain moisture.
- Reheating: If desired, warm slices briefly in a toaster oven or microwave to bring back that fresh-baked softness.
Tip: Freeze individual slices if you plan to enjoy the loaf slowly over time. This way, you can pull out exactly what you need without thawing the entire loaf.
Nutrition Breakdown: What’s Inside a Slice of Homemade Brioche?
Here's a rough breakdown per slice (based on a 10-slice loaf):
- Calories: ~230
- Fat: 11–13g (depending on butter content)
- Carbohydrates: 26–28g
- Protein: 5–6g
- Sugar: 4–6g
Compared to regular sandwich bread, brioche is higher in fat and richer due to the butter and eggs, making it an indulgent treat rather than an everyday staple.
However, it’s free from preservatives, stabilizers, and unnecessary additives—giving homemade brioche an edge in quality and flavor!
FAQs
1. What type of flour is best for brioche?
All-purpose flour works well, but bread flour will give your brioche a slightly chewier texture. If you want extra softness, stick with all-purpose.
2. Can I make brioche without a stand mixer?
Yes! While a stand mixer makes kneading easier, you can knead by hand. It will take about 15 minutes of kneading to develop the gluten structure needed for a soft and fluffy loaf.
3. Can I use this dough for rolls instead of a loaf?
Absolutely! Simply divide the dough into small portions and place them on a baking sheet or in a muffin tin. The bake time will be around 20 minutes for rolls.
4. How do I store brioche bread?
Keep brioche in an airtight container at room temperature for up to 3 days. For longer storage, wrap tightly and freeze for up to 2 months.