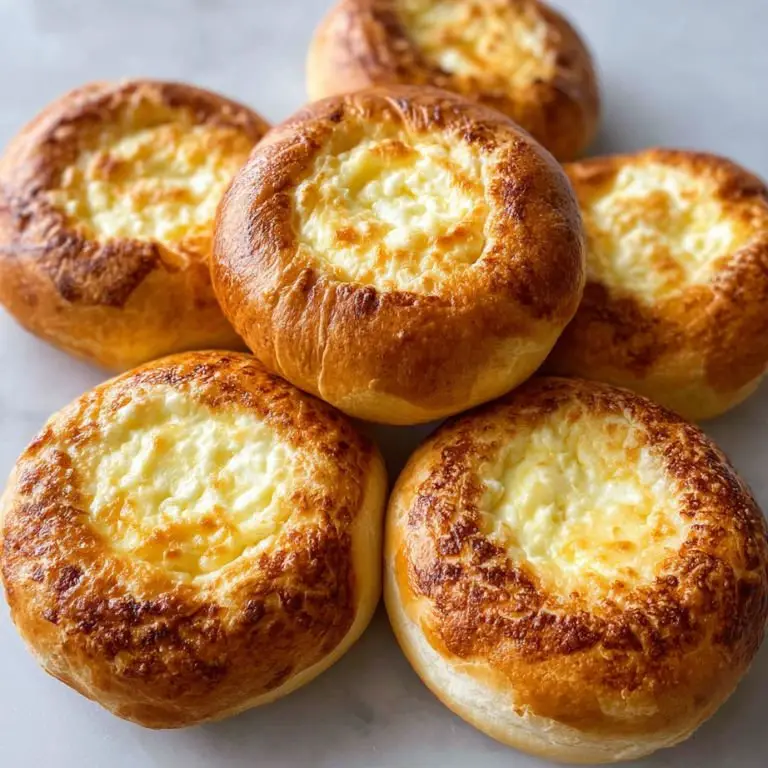
If you’ve never experienced the tender, pillowy delight of a Russian Vatrushka Cheese Pie, you’re in for a treat. This pastry is a hallmark of Eastern European baking—somewhere between a cheesecake and a bun—with a delicately sweet cheese filling nestled in a soft yeasted dough. Vatrushka is one of the most beloved russian cheese pastries, adored across generations in Russia, Ukraine, and other parts of Eastern Europe. It’s the kind of nostalgic, homestyle dessert that feels both special and deeply comforting. Whether you’re diving into Slavic baking for the first time or revisiting flavors from your childhood, this cheese pie is a perfect place to start.
Russian Vatrushka Cheese Pie
Prep Time 1 hour hr 30 minutes mins
Cook Time 25 minutes mins
Total Time 1 hour hr 55 minutes mins
Course Dessert
Cuisine Russian
Servings 8 large pies or 12 smaller ones
Mixing bowls At least two, for the dough and the cheese filling.
Stand mixer (optional) A stand mixer with a dough hook makes the kneading process easier, but hand-kneading works just fine.
Rolling Pin For shaping the dough into rounds.
Baking sheet Line with parchment paper for easy cleanup.
Pastry Brush To apply the egg wash for that golden crust.
Measuring cups & spoons Precision counts in baking!
Sieve or Cheesecloth If using ricotta, you’ll need this to drain it properly.
For the Dough
- 3 ½ cups all-purpose flour
- 1 packet 2 ¼ tsp active dry yeast
- ¾ cup whole milk warm (about 110°F)
- ¼ cup granulated sugar
- 1 tsp vanilla extract
- 1 large egg
- ¼ cup unsalted butter softened
- ½ tsp salt
For the Sweet Cheese Filling
- 1 ½ cups farmer’s cheese or well-drained ricotta or quark
- 1 egg yolk
- ¼ cup granulated sugar
- 1 tsp vanilla extract
- Zest of 1 lemon optional, but adds brightness
For Brushing
- 1 egg beaten, for egg wash
Activate the Yeast
In a small bowl, combine the warm milk, a tablespoon of sugar, and the yeast. Stir and let it sit for 10 minutes until foamy. This step is essential—if the yeast doesn’t foam, it’s likely expired.
Make the Dough
In a large mixing bowl (or the bowl of a stand mixer), combine the remaining sugar, egg, vanilla, and salt. Mix until combined, then add the yeast mixture and half the flour. Begin mixing and slowly add the softened butter and the rest of the flour. Knead for 7-10 minutes until the dough is soft and elastic.
Cover the bowl with a towel or plastic wrap and let it rise in a warm place for 1 hour, or until doubled in size.
Prepare the Cheese Filling
While the dough is rising, make the filling. Combine the farmer’s cheese, egg yolk, sugar, vanilla, and lemon zest in a bowl. Mix until smooth. The texture should be thick and creamy—not runny.
This filling is similar to what you’d find in a polish baked cheesecake like sernik or other eastern European cheese pies. It’s gently sweet, with a fresh dairy flavor that's not overly rich.
Shape the Pies
After the dough has risen, punch it down and divide it into equal pieces—8 or 12 depending on your desired size. Shape each piece into a ball, then flatten it into a circle about 4-5 inches wide.
Using your fingers or the bottom of a cup, press a deep well into the center of each dough round, leaving a 1-inch border. This is where the cheese will go.
Fill and Bake
Spoon the cheese filling into the center of each dough round. Brush the edges with beaten egg for a glossy finish.
Preheat your oven to 350°F (175°C). Place the pies on a parchment-lined baking sheet, leaving some space between each. Bake for 22-25 minutes or until golden and puffed.
Cool and Serve
Let the pies cool slightly before serving. They’re wonderful warm, at room temperature, or even chilled.
Pairings
Vatrushka Cheese Pie pairs beautifully with afternoon tea or a strong cup of coffee. If you’re serving it for brunch, add some fresh berries or a dollop of sour cream on the side. For a fuller Slavic-inspired spread, consider pairing it with a savory russian vegetable pie or a light cucumber-dill salad. You could even go all out and serve this after a warm dish of traditional russian chicken pie for a full meal steeped in comfort and heritage.
While vatrushka is a dessert, its mild sweetness also makes it a fitting companion for lightly savory bites, much like how sweet rolls often accompany cheese or cured meats in European breakfasts.
FAQs
1. Can I use cream cheese instead of farmer’s cheese?
Yes, you can substitute with cream cheese, though the flavor and texture will be slightly richer and smoother. For something closer to traditional, mix cream cheese with ricotta or cottage cheese. If you're looking for something similar to polish desserts like sernik, this will hit the mark.
2. Is this the same as Russian cheesecake?
Not quite. Russian cheesecake, or zapekanka, is typically baked in a dish and has a more uniform, cake-like texture throughout. Vatrushka is closer to a filled bun or open-faced tart with a distinct border of soft dough and a cheesy center. However, if you’re exploring how to make russian cheesecake, this is a fantastic stepping stone.
3. Can I make it savory instead of sweet?
Absolutely. While this recipe leans sweet, traditional russian pie fillings vary widely. You could easily swap the sugar and vanilla in the filling for herbs, garlic, and a pinch of salt to create a savory version—great with spinach or mushrooms. It’s a cousin to the serbian cheese pie or even a mild twist on a cheese-stuffed khachapuri.
4. What other types of Russian pies are worth trying?
There’s a whole world of Russian pie recipes to explore—from hearty kulebyaka (salmon pie), to the vegetarian-friendly mushroom and cabbage pirog, to sweet apple and berry versions. Many of them feature similar doughs with different fillings. If you’re diving into a Russian recipe for homemade pies, you’ll find endless options that span sweet, savory, and everything in between.
5. Can I freeze Vatrushka pies?
Yes! These pies freeze quite well. Let them cool completely, wrap individually, and store in a freezer-safe container. Reheat in a 300°F oven until warmed through. The texture remains soft and the cheese filling retains its delicate flavor.