There’s something comforting and nostalgic about biting into a perfectly shaped Japanese onigiri rice ball, especially when it’s filled with flaky, savory salmon and wrapped in crisp seaweed. This isn’t just food—it’s a bite-sized piece of Japanese tradition. Whether it’s tucked lovingly into a lunchbox as part of a Japanese bento, picked up from a konbini (convenience store) during a busy day, or made at home with your own twist, onigiri is the kind of dish that’s deceptively simple yet endlessly customizable. Today, we’re diving into a classic version: Japanese onigiri rice balls with salmon and seaweed—simple, satisfying, and full of umami.
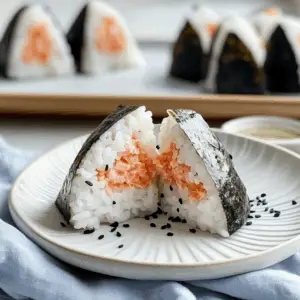
Japanese Onigiri Rice Balls with Salmon and Seaweed
Prep Time 20 minutes mins
Cook Time 25 minutes mins
Total Time 45 minutes mins
Course Appetizer, Breakfast, Lunch, Snack
Cuisine Japanese
Servings 6 onigiri (about 3 servings)
Rice cooker or pot A rice cooker gives the perfect texture, but you can use a heavy-bottomed saucepan with a tight-fitting lid.
Grill pan or skillet For cooking the salmon; a nonstick pan works just as well.
Plastic wrap or onigiri mold (optional) Helpful if you’re aiming for that “onigiri aesthetic,” but clean hands and a little salted water work fine.
Sharp knife and cutting board For prepping salmon and cutting seaweed.
Mixing bowl For flaking the salmon and combining it with seasoning if desired.
For the Rice
- 2 cups Japanese short-grain rice like Koshihikari or sushi rice
- 2 ¼ cups water for cooking the rice
- 1 tsp salt adjust to taste
For the Filling
- 1 skinless salmon fillet about 6 oz
- Salt for seasoning
- ½ tsp soy sauce optional for marinating or flavoring cooked salmon
For Assembly
- Roasted nori seaweed sheets cut into strips or squares
- Salted water 1 cup water + ½ tsp salt for shaping onigiri
- Optional: toasted sesame seeds for garnish
Optional Add-ins or Variations
- Umeboshi pickled plum for a tangy filling
- Kombu tsukudani sweet-simmered seaweed for a plant-based twist
- Seasoned furikake rice seasoning mix
Step 1: Cook the Rice
Start by rinsing your Japanese short-grain rice under cold water until the water runs clear—this removes excess starch and helps with the final texture. Add 2 cups of rinsed rice to your rice cooker or pot, pour in 2¼ cups of water, and let it soak for 20–30 minutes if time allows. Cook the rice according to your appliance’s settings or, if using a pot, bring to a boil, reduce to a simmer, cover, and cook for 15 minutes. Turn off the heat and let it steam for another 10 minutes.
Step 2: Prepare the Salmon
Season your salmon fillet with a generous pinch of salt and let it sit for about 10 minutes to draw out excess moisture. Grill or pan-fry over medium heat until cooked through and lightly browned on both sides, about 4–5 minutes per side. Let it cool slightly, then flake into small pieces. You can add a dash of soy sauce or toasted sesame oil for extra flavor, though this step is optional.
Step 3: Set Up for Assembly
Have your salted water ready in a small bowl—it helps keep rice from sticking to your hands and adds seasoning. Cut your seaweed into the desired shapes. For traditional looks, a rectangle that wraps the bottom half of the triangle works best. For cute onigiri that resemble characters or shapes, get creative with seaweed cutouts!
Step 4: Shape the Onigiri
Wet your hands with salted water and take about ½ cup of warm (not hot) rice. Flatten it slightly in your palm and place a small spoonful of flaked salmon in the center. Gently fold the rice over the filling and shape it into a triangle, applying light pressure. Be gentle but firm—too much pressure will crush the grains, but too little and it may fall apart.
Wrap the base with a strip of nori and optionally sprinkle with sesame seeds or furikake. You can use plastic wrap or an onigiri mold if you're after a uniform, bento-friendly shape.
Step 5: Serve or Store
Onigiri is best eaten fresh or within a few hours, especially if it's part of a Japanese bento. If making in advance, wrap individually in plastic wrap and store in the fridge. Allow to come to room temperature before eating—cold rice can become firm and less flavorful.
Perfect Pairings
These onigiri rice balls make an excellent part of a larger bento ensemble. Pair them with Japanese-style tamagoyaki (rolled omelet), edamame, and pickled vegetables like takuan (yellow pickled daikon). A warm cup of miso soup on the side makes it feel like a full meal. For a fun twist, add a small container of dipping soy sauce with a touch of wasabi or ponzu.
If you're packing them for a picnic or lunch, consider adding some fruit slices or Japanese sweets like mochi for a sweet-savory balance.
FAQs: Everything You Wanted to Know About Making Onigiri
1. Can I make this with other types of fish or meat?
Absolutely! Onigiri recipe filling ideas are limitless. Try canned tuna mixed with mayo, spicy cod roe (mentaiko), grilled chicken teriyaki, or even leftover beef curry. Just keep the filling dry-ish to avoid soggy rice.
2. What kind of salmon should I use?
Fresh or frozen salmon fillets both work. Make sure to remove the skin and bones before cooking. You can also use smoked or canned salmon in a pinch—just adjust seasoning accordingly.
3. Can I make vegan onigiri or vegetarian onigiri?
Yes! Vegetarian onigiri and vegan onigiri are just as delicious. Use fillings like umeboshi, kombu, miso-seasoned mushrooms, or even seasoned tofu. The savory-sweet combo in many easy Japanese recipes works great here.
4. How do I get the classic triangle shape?
Use your hands, plastic wrap, or an onigiri mold. Wet your hands with salted water, take warm rice, add the filling, and shape it gently. If you’re into bento recipes or the onigiri aesthetic, a mold helps make uniform shapes quickly.
5. How long do onigiri last?
If made with cooked fillings like salmon and kept refrigerated, they’re good for about 24 hours. However, they’re best eaten the same day, especially if seaweed is already attached—it can become chewy.