If you love momos but do not love babysitting a steamer or dealing with a deep-fry situation, this baked paneer momos recipe is your new weekend (or weeknight) obsession. These momos are stuffed with a punchy paneer filling that leans a little street-style: ginger, garlic, soy, vinegar, and spring onion for that savory, can-not-stop vibe. Then they go into a hot oven on a lightly oiled tray so the bottoms get toasty, the pleats stay tender, and the whole thing finishes with crisp, golden spots. The mint chutney is the fast, fresh counterpoint: mint, cilantro, lemon, and green chile blended until it tastes like it could wake up a sleepy snack plate. Think vegetarian fast food energy, but made at home, with real ingredients and control over spice. I also added a couple of shortcuts (like using store-bought wrappers) because sometimes you just want quick cooking recipes that still taste like you tried.
Baked Paneer Momos with Mint Chutney (Crispy Edges, Juicy Center)
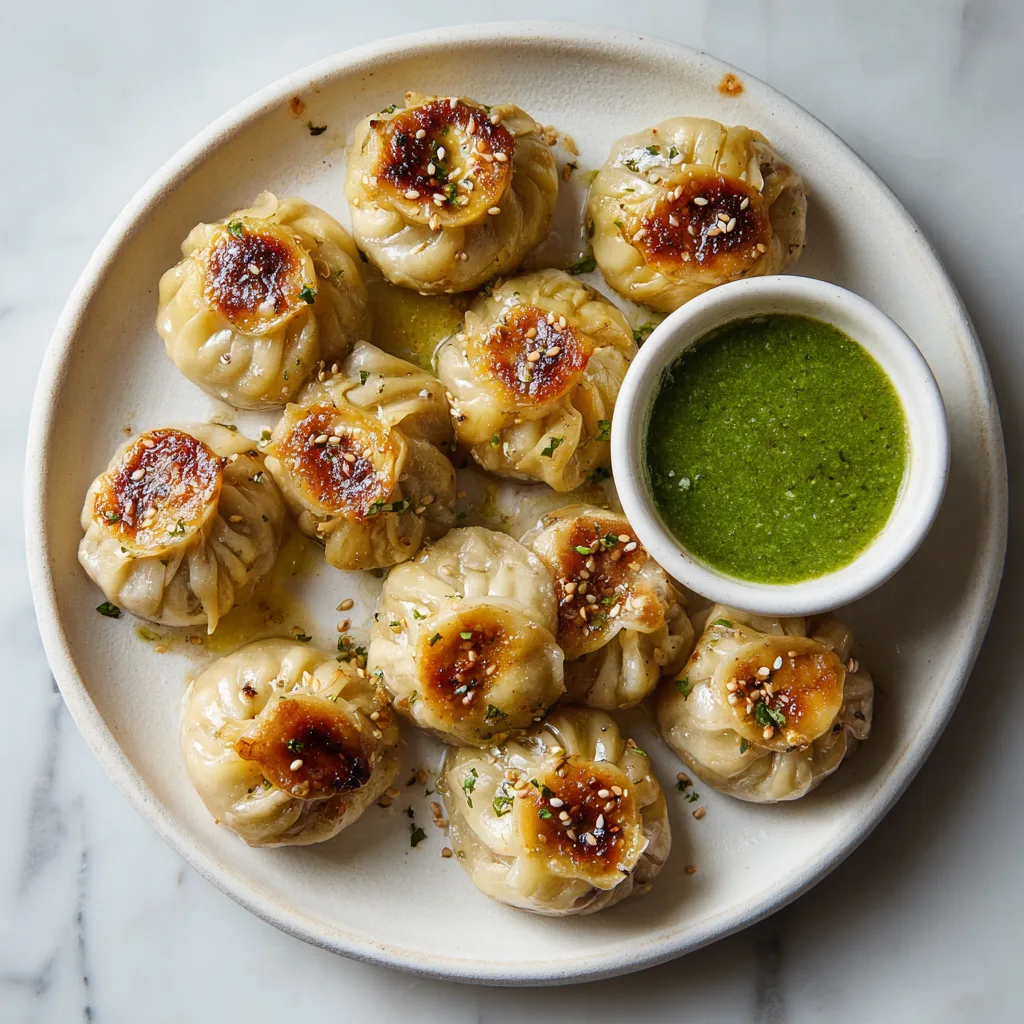
Crisp-edged baked momos packed with spicy paneer filling, served with bright mint chutney.
Prep Time 35 minutes mins
Cook Time 25 minutes mins
Total Time 1 hour hr
Course Snack
Cuisine Indian
Large Mixing Bowl for the momo dough; a stainless bowl is ideal, but any non-reactive bowl works
box grater or fork to grate or crumble paneer evenly; a fork works if your paneer is soft
Small skillet for blooming aromatics and drying out the filling; a nonstick pan helps prevent sticking
Rimmed baking sheet a heavy sheet browns better; line with parchment for easier cleanup, or lightly oil the pan if skipping parchment
Pastry Brush for brushing oil on the momos; if you do not have one, use clean fingertips or a paper towel
Blender or small food processor for mint chutney; an immersion blender in a tall cup also works
Rolling Pin for rolling wrappers; a smooth bottle can stand in if needed
For the momo dough (or use wrappers)
- 2 cup all-purpose flour plus extra for dusting; you can swap in 1/2 cup whole wheat flour for a slightly nutty dough
- 1/2 teaspoon fine salt seasoning for the dough
- 3/4 cup water room temperature; add gradually because humidity changes flour thirst
- 1 teaspoon neutral oil like avocado or canola; optional but helps the dough stay pliable
- 30 round dumpling wrappers optional shortcut; use 3 1/2 inch wrappers to turn this into a true quick cooking recipe on busy days
For the paneer filling
- 1 1/2 cup paneer grated or crumbled; homemade paneer or store-bought both work, but use a firm block so it does not turn pasty
- 2 tablespoon neutral oil for sauteing; ghee is also great for a richer filling
- 3 spring onion thinly sliced; keep the whites and greens separate if you want a little extra garnish
- 2 teaspoon fresh ginger finely grated
- 2 teaspoon garlic finely grated or minced
- 1 green chile finely chopped; adjust to your heat preference
- 1 tablespoon soy sauce use regular or low-sodium; adds that classic momo shop savoriness
- 2 teaspoon rice vinegar or white vinegar; this keeps the filling bright, not heavy
- 1 teaspoon toasted sesame oil optional but very good; skip if you want a more traditional spice profile
- 1/2 teaspoon black pepper freshly ground if possible
- 1/4 teaspoon sugar optional; balances soy and vinegar
- 1 tablespoon cornstarch helps the filling bind so it does not crumble out when you bite
For baking and finishing
- 1 1/2 tablespoon neutral oil for brushing; this is a big part of how to make crispy paneer momos in the oven
- 1 tablespoon butter optional; melt and brush after baking for a glossy, richer finish
- 1 tablespoon toasted sesame seed optional garnish
For mint chutney
- 1 cup mint leaves packed; tender stems are fine
- 1 cup cilantro packed; include stems for extra flavor
- 1 green chile or 2 if you like it spicy
- 1 tablespoon lemon juice adds pop; lime works too
- 1 teaspoon cumin roasted cumin powder is especially nice
- 1/2 teaspoon fine salt plus more to taste
- 2 tablespoon water to blend; add more to thin into a drizzly chutney
- 2 tablespoon plain yogurt optional; makes it creamy and mellow, skip for a dairy-free chutney
Make the mint chutney
Add mint leaves, cilantro, green chile, lemon juice, cumin, salt, and water to a blender. Blend until smooth and bright green, scraping down once so you do not end up with leafy confetti.
Taste and adjust: more salt for savoriness, more lemon for zing, or a splash more water if you want a pourable chutney. If using yogurt, blend it in at the end so it stays fresh-tasting. Refrigerate while you make the momos (it gets even better after 10 minutes).
Mix and rest the momo dough (skip if using wrappers)
In a large mixing bowl, stir together flour and salt. Drizzle in the oil (if using). Add water a little at a time, mixing with your hand or a spoon, until the dough looks shaggy and you can press it into a ball.
Knead for 6 minutes until smooth and springy. The dough should feel firm but pliable; if it is sticky, dust in a spoonful of flour, and if it is dry or cracking, wet your fingertips and knead in a little water.
Cover the bowl with a damp towel and rest for 15 minutes. This rest is not optional if you want thin wrappers without a fight.
Cook the paneer filling
Heat the oil in a small skillet over medium heat. Add spring onion, ginger, garlic, and green chile. Cook for 1 minute until fragrant and just softened (do not let the garlic brown).
Add paneer and toss well. Cook for 2 minutes, stirring, to drive off moisture so the filling stays fluffy instead of wet.
Add soy sauce, rice vinegar, toasted sesame oil (if using), black pepper, and sugar (if using). Sprinkle in cornstarch and stir for 30 seconds so it coats and lightly binds. Turn off the heat and cool for 10 minutes before shaping; warm filling can soften wrappers and make pleating annoying.
Shape the momos
Heat the oven to 425 F. Lightly oil a rimmed baking sheet or line with parchment, then brush a thin film of oil on top (this helps browning).
If using dough: divide rested dough into 24 small pieces and keep them covered. Roll each piece into a 3 1/2 inch circle, keeping the center slightly thicker than the edges (this makes the pleats less likely to tear).
Add 1 tablespoon filling to the center. Pleat the edges all the way around, pinching to seal. You can do the classic momo pleat, a half-moon, or a simple gathered pouch. The only rule: seal it well so steam stays inside.
Arrange momos on the baking sheet with space between them. Brush the tops and sides with oil (be generous but not drippy). This is a major part of getting that baked-crisp finish people want from a momos recipe paneer style.
Bake until crisp and spotty-golden
Bake for 18 minutes. Rotate the tray and bake for 5 minutes more. You want light golden spots on the folds and deeper browning underneath.
For extra crisp edges, switch to broil on high for 2 minutes, watching closely. When they look blistered in places and the pleats are set, pull them out.
Optional finish: brush with melted butter right after baking for shine and a richer aroma. Sprinkle with toasted sesame seed if you like.
Serve hot with mint chutney. If you are trying to nail that �oven-fried� vibe and wondering how to make crispy paneer momos without deep frying, do not skip the oil-brush step and the final broil.
Baked paneer momos are snacky enough to stand alone, but they really shine with a few smart sides.
If you are building a platter for guests, keep the momos warm in a low oven (250 F) and serve chutney plus one extra sauce. Add sliced radish, carrot sticks, and a handful of roasted peanuts or crunchy chana for texture. It feels abundant without requiring a second main dish.
Use firm paneer that you can grate or crumble cleanly. Fresh homemade paneer can be a little softer and wetter, so if you are using it, pat it dry and saute the filling long enough to drive off moisture. Store-bought paneer is usually firmer and very easy for momos. Avoid ultra-soft paneer that smears into a paste, because the filling turns dense instead of fluffy.
Yes. Round dumpling wrappers (about 3 1/2 inch) are a great shortcut and are perfect for quick cooking recipes. Keep them covered with a barely damp towel while you work so the edges do not dry out and crack during pleating.
Two things matter: (1) do not under-fill (a full tablespoon helps the center stay juicy), and (2) brush oil on the outside so the wrapper does not dehydrate before it browns. Also, do not overbake; pull them when you see golden spotting and the dough looks set, not leathery.
You can. For a non-vegetarian option, use finely minced boneless chicken thigh for the juiciest filling, or boneless chicken breast if you want it leaner. Cook the minced chicken with the aromatics until no longer pink, then season with the same soy-vinegar mix and cool before filling. Keep the filling fairly dry so it does not leak.
Yes. Shape the momos and refrigerate them on a tray (covered) for up to 24 hours, then bake as written. For leftovers, reheat in a 400 F oven for 8 minutes to bring back the crisp edges. Microwaving works in a pinch, but the wrappers soften and you lose the best part.