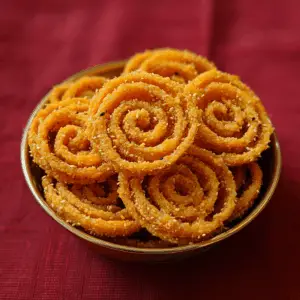
Baked Chakli brings a beloved Gujarati snack into the healthier realm, replacing deep-frying with oven-baking to reduce oil while keeping those irresistible crunchy spirals. This version uses a blend of rice flour, chickpea (besan) flour, and aromatic spices for a lighter yet flavorful twist. Whether you’re craving diwali snacks, spicy snacks recipes, or just a wholesome dry snack for breakfast, this baked chakli offers a guilt-free, crave-worthy treat that still feels indulgent.
Baked Chakli
Prep Time 20 minutes mins
Cook Time 20 minutes mins
Total Time 40 minutes mins
Course Appetizer, Snack
Cuisine Indian
Servings 35 medium-sized chaklis
Chakli/murukku press with star-shaped plate essential for traditional spirals
Baking sheet
Parchment paper or a non-stick baking mat
Mixing bowls
Pastry Brush to apply oil
Rolling Pin (for flattening the dough disc)
Oven preheated to 350°F (175°C)
Cooling rack crucial for letting the chaklis crisp fully after baking
- Rice flour chakli recipe base: 1 cup rice flour
- Chickpea flour besan: ½ cup
- Semolina suji/rava: 2 tbsp (optional for extra crispiness)
- Butter softened: 2 tbsp (for richness and binding)
- Yogurt: 2 tbsp helps with dough pliability
- Sesame seeds: 1 tsp
- Ajwain carom seeds: ½ tsp
- Red chili powder: 1 tsp
- Turmeric powder: ½ tsp
- Asafoetida hing: a pinch
- Salt: 1 tsp adjust to taste
- Water: 3–4 tbsp or as needed
- Oil: 1–2 tsp for brushing before baking
Prepare the dough
In a large mixing bowl, combine rice flour, besan, semolina, sesame seeds, ajwain, turmeric, chili powder, asafoetida, and salt. Add softened butter and yogurt, mixing with your fingertips until the texture resembles breadcrumbs.
Gradually add water, 1 tablespoon at a time, kneading gently to form a smooth, pliable dough. Cover and let it rest for 10 minutes.
Preheat the oven
Preheat your oven to 350°F (175°C). Position a rack in the middle.
Shape the chaklis
Line a baking sheet with parchment paper. Grease the chakli press, fill it with dough, and press spirals directly onto the sheet, leaving 1 inch between each. Use a piping bag if improvising—pipe tight ‘snail’ spirals about 3 inches wide.
After completing one sheet, brush tops lightly with oil to enhance crispness.
Bake
Bake for 18–20 minutes, rotating the sheet halfway through. Chaklis should turn light golden, not deep brown—over-baking may dry them excessively.
Cool thoroughly
Remove from oven and immediately transfer to a cooling rack. Let them cool fully (about 30 minutes); they’ll crisp up as they rest. Once cool, they’re ready for storage or serving.
Pairings
- Masala chai: A warm, spiced brew complements the slightly spicy chakli—classic Indian snack territory.
- Tomato-onion dip: Dice tomatoes, onions, green chilies; season with salt, pepper, lemon juice—fresh and tangy.
- Curd chutney: Blend thick yogurt with mint, coriander, green chili, and salt for a cooling, creamy counterpart.
- Fruit smoothies: A tropical mango or banana smoothie creates a balanced sweet-savory breakfast vibe.
- Spiced buttermilk (chaas): Blend buttermilk with roasted cumin powder, salt, chopped cilantro—perfect for a light snack session.
FAQs
1. Can I use only besan without rice flour?
You can experiment with 100% besan but expect a denser, heavier snack. The rice flour contributes crispiness that mimics traditional fried murukku and dry snacks recipes Indian states covet.
2. Can I make it gluten-free?
Yes! This recipe is naturally gluten-free provided your semolina isn’t wheat-based. You may skip semolina or use chickpea semolina if needed.
3. Which type of flour should I use?
Use plain rice flour (not glutinous). You’ll find it in bulk stores or Indian groceries, often labeled under South Asian brands.
4. Can I make smaller or larger chaklis?
Absolutely—shape them small as bite-sized snacks or large like typical diwali snacks. Just adjust the baking time slightly (smaller sizes take less time, around 15 minutes).
5. How do I store them?
Ensure they’re completely cool, then store in an airtight container. They stay fresh and crunchy up to 2 weeks—never refrigerate, it can introduce moisture.