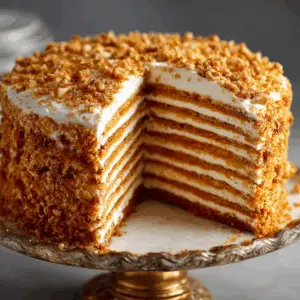
Russian Honey Layer Cake with Burnt Honey and Walnuts
Equipment
- Heavy-bottomed saucepan Crucial for making burnt honey and heating the honey mixture. A light-colored pan helps you monitor color changes.
- Mixing bowls At least two large bowls—one for wet ingredients and one for flour.
- Electric mixer or stand mixer Essential for whipping the cream filling to the right consistency.
- Rolling Pin Used to roll out the thin cake layers.
- Round cake cutter or cake pan base To ensure even-sized cake layers.
- Baking sheets with parchment paper Prevents sticking and helps in uniform baking.
- Offset spatula or bench scraper For spreading cream and smoothing the sides.
- Wire Rack For cooling the layers.
- Cake storage container or box for cake transport Keeps your masterpiece intact if you're bringing it to a party or potluck.
Ingredients
For the Cake Layers
- 3/4 cup honey use a floral or wildflower variety for best flavor
- 1/4 cup burnt honey instructions below
- 1 cup granulated sugar
- 3 large eggs room temperature
- 1/2 cup unsalted butter
- 1 tsp baking soda
- 3 1/2 cups all-purpose flour sifted
For the Burnt Honey
- 1/2 cup honey
For the Cream Filling
- 2 cups sour cream full fat
- 2 cups heavy whipping cream
- 1/2 cup powdered sugar
- 2 tsp vanilla extract
For Assembly
- 1/2 cup toasted walnuts finely chopped
- Reserved cake crumbs for decoration
Instructions
Step 1: Make the Burnt Honey
- Start by making the burnt honey, which adds a deep, slightly bitter caramel edge that offsets the sweetness. In a small saucepan, heat 1/2 cup of honey over medium-high heat. Let it boil and darken—watch for it to turn a rich amber, just shy of smoking. This should take around 3–5 minutes. Remove from heat and let cool slightly.
Step 2: Prepare the Honey Mixture
- In a heavy-bottomed saucepan over medium heat, combine the remaining 3/4 cup honey, granulated sugar, butter, and the freshly made burnt honey. Stir until the butter melts and the sugar dissolves. Once the mixture is warm (but not boiling), remove from heat.
- Immediately whisk in the baking soda—this will cause the mixture to foam and lighten in color. Let it cool slightly, then whisk in the eggs one at a time. Be quick to avoid scrambling the eggs.
Step 3: Mix the Dough
- Gradually add the sifted flour into the honey-egg mixture until a soft dough forms. The dough should be pliable and a bit tacky but not too sticky. Divide the dough into 8 equal portions and cover with plastic wrap to prevent drying out.
Step 4: Bake the Layers
- Preheat your oven to 350°F (175°C). Roll out each portion of dough into a thin round (about 1/8 inch thick), roughly 8 inches in diameter. Bake each round on a parchment-lined sheet for 5–6 minutes, or until golden brown and puffed slightly.
- As each layer comes out, let it cool on a wire rack. Save one or two layers to crumble for the final topping.
Step 5: Make the Cream Filling
- In a large bowl, whip the heavy cream until soft peaks form. In a separate bowl, whisk the sour cream with powdered sugar and vanilla extract. Fold the whipped cream into the sweetened sour cream until fully combined. The result should be light, creamy, and tangy—perfectly balanced with the honey layers.
Step 6: Assemble the Cake
- Place one cake layer on a serving plate. Spread a generous amount of cream filling over the top. Repeat with the remaining layers, finishing with cream on top and sides.
- Crush one of the extra cake layers into fine crumbs and mix with chopped toasted walnuts. Press this mixture gently onto the sides and top of the cake for a rustic, golden crust. This gives the honey cake decoration a homespun, artisanal charm.
Step 7: Chill and Serve
- Cover the cake and refrigerate for at least 8 hours, preferably overnight. This allows the cream to seep into the layers and soften them, transforming the crisp rounds into a tender, sliceable masterpiece.